

Jotai for state management
When it comes to creating a website using React, there are various options available for managing the application's state. One popular choice is Redux, but at the time it was launched, it was quite complicated, & users reported some performance issues.
However, over time, other state management options have emerged, such as Easy-Peasy. Additionally, React itself offers a solution called React Context, which helps with avoiding the hassle of passing props through multiple components (prop-drilling).
Even as the days passed, the Redux team recognized the need to simplify the usage of Redux. To address this, they introduced the Redux Toolkit, which is now the recommended way to use Redux. It provides a more straightforward and streamlined approach.
But there's another state management tool that surpasses Redux and Easy Peasy in terms of simplicity: Jotai. If you haven't heard of it before, don't worry! This post will explain Jotai in the easiest way possible, so you can understand how to use this tool effectively.
Excited? Let's dive right in!
But Why Jotai?
Using Jotai may not be the right choice for every developer solely based on its ease of use. To better understand why Jotai can be a good option, let's delve into its benefits and discuss its potential features.
· Easy to Use and Learn
When working with the Redux Toolkit, you need to define reducers, and actions, and handle payloads to modify the state. In addition to using the store, you also have to use the "useDispatch" and "useSelector" hooks.
Similarly, when considering the Easy Peasy state management tool, it shares similarities with Redux. Both tools require learning different concepts, such as defining reducers and actions.
On the other hand, Jotai offers a slightly different approach. If you are already familiar with the "useState" hook, you'll find it easy to understand and use Jotai in your projects.
· Less Boilerplate Code and the Same Functionality
When using Redux Toolkit, even for simple tasks like adding increment and decrement functionality, we often need to write numerous lines of code.
The same applies to the Easy Peasy State Management tool.
However, when it comes to Jotai, you can achieve the functionality of a complete working app with just a few lines of code. This means that you can create a fully functional app using Jotai without the need for extensive code writing.
· Number of Additional Utilities, Integrations, and Tools
Not only is it easy to learn and implement, but Jotai also offers a range of additional functionalities that enhance its capabilities.
For instance, Jotai provides various utility functions like “atomWithStorage”, which allows you to store the value of an atom in Local Storage or Session Storage. Additionally, there's a utility function called “useHydrateAtoms” that aids in server-side rendering (SSR) functionality. These are just a couple of examples, as there are more utility functions available.
Jotai also boasts seamless integration with popular libraries and frameworks such as tRPC, Query, Immer, and XState, allowing you to leverage the combined power of these tools.
Furthermore, Jotai offers a selection of plugins and tools designed to enhance your development experience. These include support for React Fast Refresh, which enables faster component reloading during development, and debugging tools for improved troubleshooting.
In short, Jotai is not only easy to learn and use, but it also reduces boilerplate code with its utility functions, supports seamless integrations, and provides helpful plugins and tools.
But what are its features?
According to the official documentation, it has a number of features it provides many utilities, and even supports integration with TypeScript, Next.js, Gatsby, Remix, and so on.
It also provides plugins for React Fast Refresh and Babel (will discuss more in the later part of this blog post).
Getting Started With Jotai
As we know, Jotai can be integrated with various frameworks and libraries, depending on your preferences.
For example, if you are creating a React app, you can easily install Jotai by using the following command:
To begin using Jotai, all you need is familiarity with the “useState” hook. The same concept applies here, which makes it easy for anyone to learn and use.
Let's break the process down into three simple steps:
Step 1: Define an atom with an initial value.
You have to first initialize an atom with an initial value. For example:
- If you want to start with a number, you can create an atom like this: const number = atom(0)
- If you prefer a string, you can do it like this: const animal = atom('Lion')
You can even initialize atoms with booleans, arrays, or objects.
Step 2: Use the atom inside your component, just like you would use the useState hook.
To do this, you can declare a state variable and a corresponding setter function, using the useAtom hook:
Step 3: Use the atom values in your component and modify them.
Now you can use the values from the atoms in your component's JSX.
For example:
In the above code, we display the count value in an <h3> element and provide an incrementing button. Similarly, we display the string value in a <p> element and give a button to alter it to 'Tiger'.
That's it.
By following these three steps, you can efficiently use Jotai for state management in your React components. It's clear and simple to use, making it easier to keep your application's condition under check and to make any adjustments.
Here is a working example:
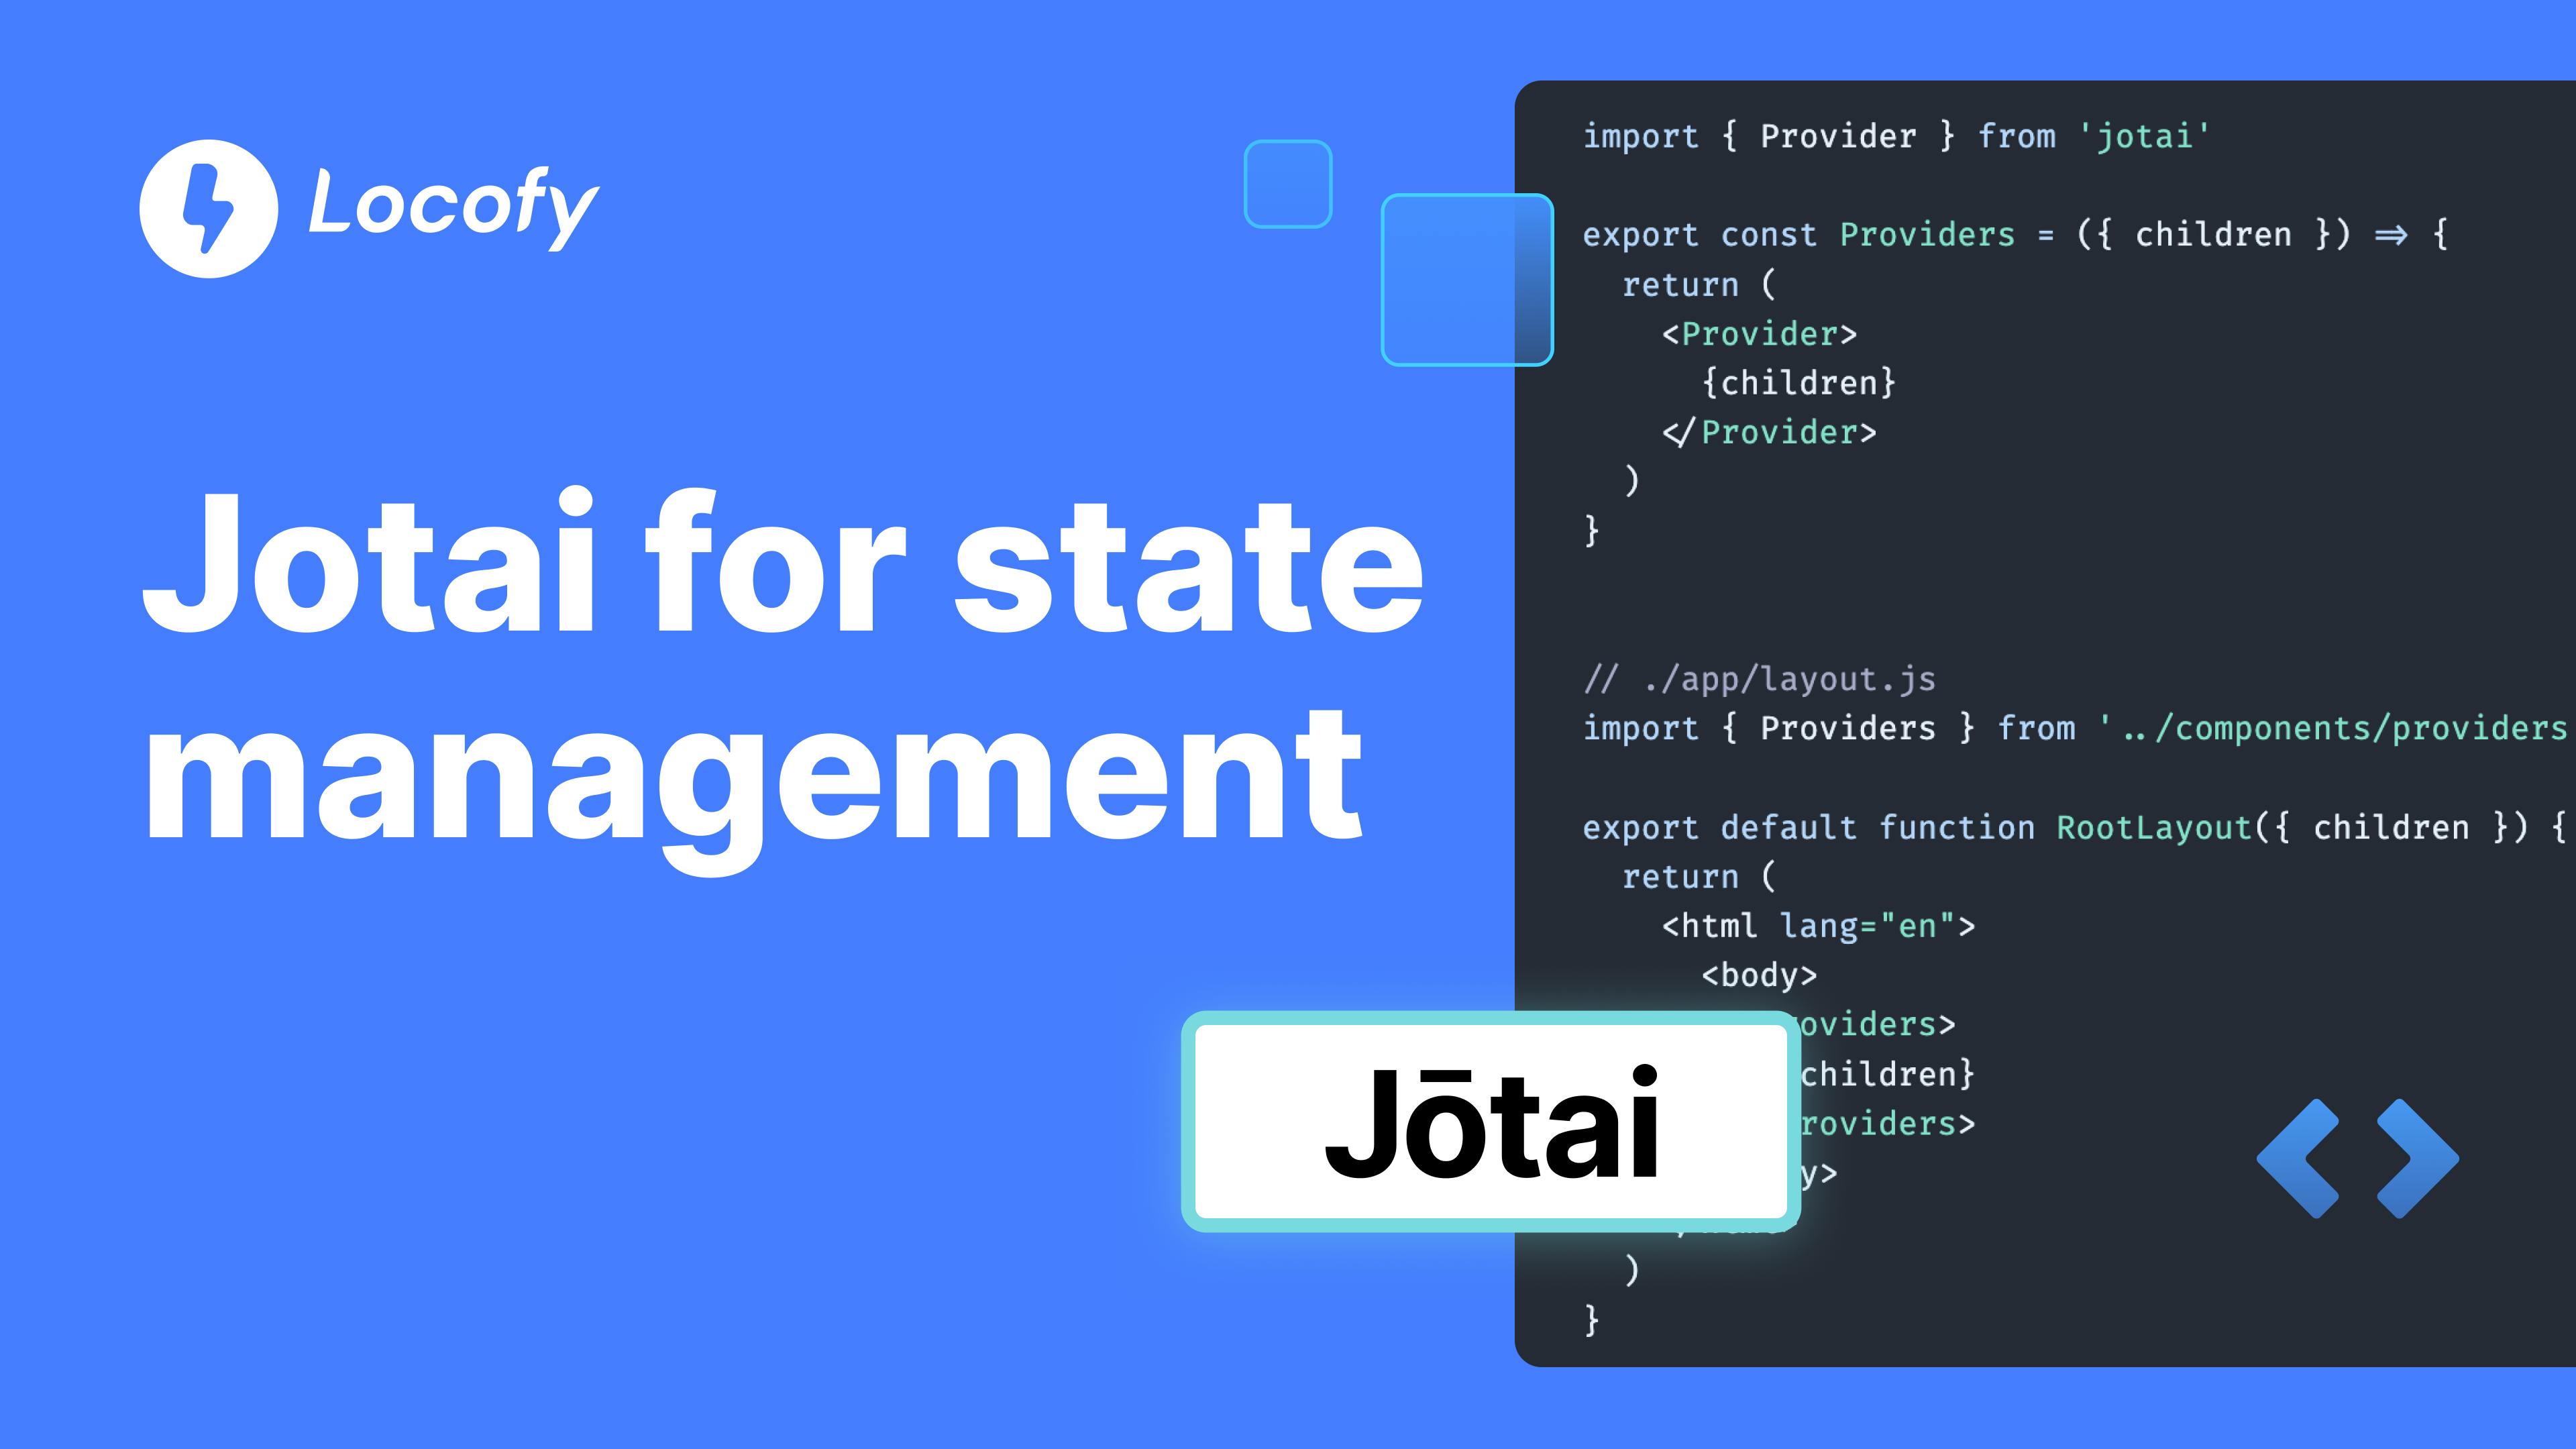
Implementing Theme Switching Functionality with Jotai and Locofy.ai in just a few steps
In our previous example, we explored a simple scenario where we incremented a number and changed a string to a different value. However, we didn't fully witness the power of Jotai for state management since we were only working with a single component.
To truly understand the capabilities of Jotai, let's dive into another example: toggling themes with the help of a button. In this case, we will use different components and pass the necessary states between them. This will demonstrate how Jotai enables seamless communication and management of the state across multiple components.
Here we use Locofy.ai to generate frontend code from a Figma design. We run our Lightning plugin on the Figma file, and in a matter of minutes, we are greeted with responsive frontend code ready to export for production.

We begin implementing our fundamental functions as recommended by Locofy.ai after exporting the code and running it on our computer in VSCode. We start by running:
Then, in the next step, we run this project locally using:
After running this successfully, we can begin the next steps and implementing Jotai by installing it via
With that commands running, let's explore how Jotai simplifies the process of toggling themes and enhances the user experience of your application.
We modify some files by adding the file atoms.ts in the root src folder of the project.
Then we create a ThemeToggle.tsx component in the components folder.
You can see how atoms and the useAtom hook, two crucial Jotai hooks, are used in the above code snippets.
An atom that we initially constructed and used inside the App component initializes the light theme.
Now that everything is set up, we are free to use the theme property in any component.
To show this, the theme property within the “ThemeToggle” component has been accessed and used using the “useAtom” hook.
We can also add our dedicated dark mode code and CSS to the CSS files, like we did on the homepage.
Here is the output of the dark and light theme toggling on the homepage, but you can also easily pass the context into all the components, be it cards or other elements, to make it more aesthetically appealing. Check out this GitHub repo here and play with Jotai and Locofy.ai to learn more.

Jotai Utilities, Tools and Plugins: Boosting Development Efficiency
We have learned the basics of Jotai, but it also provides a number of utilities, integrations, and plugins to boost development efficiency.
For example, you may use the “atomWithStorage” function to store value inside Local Storage or Session Storage.
Here is the output.
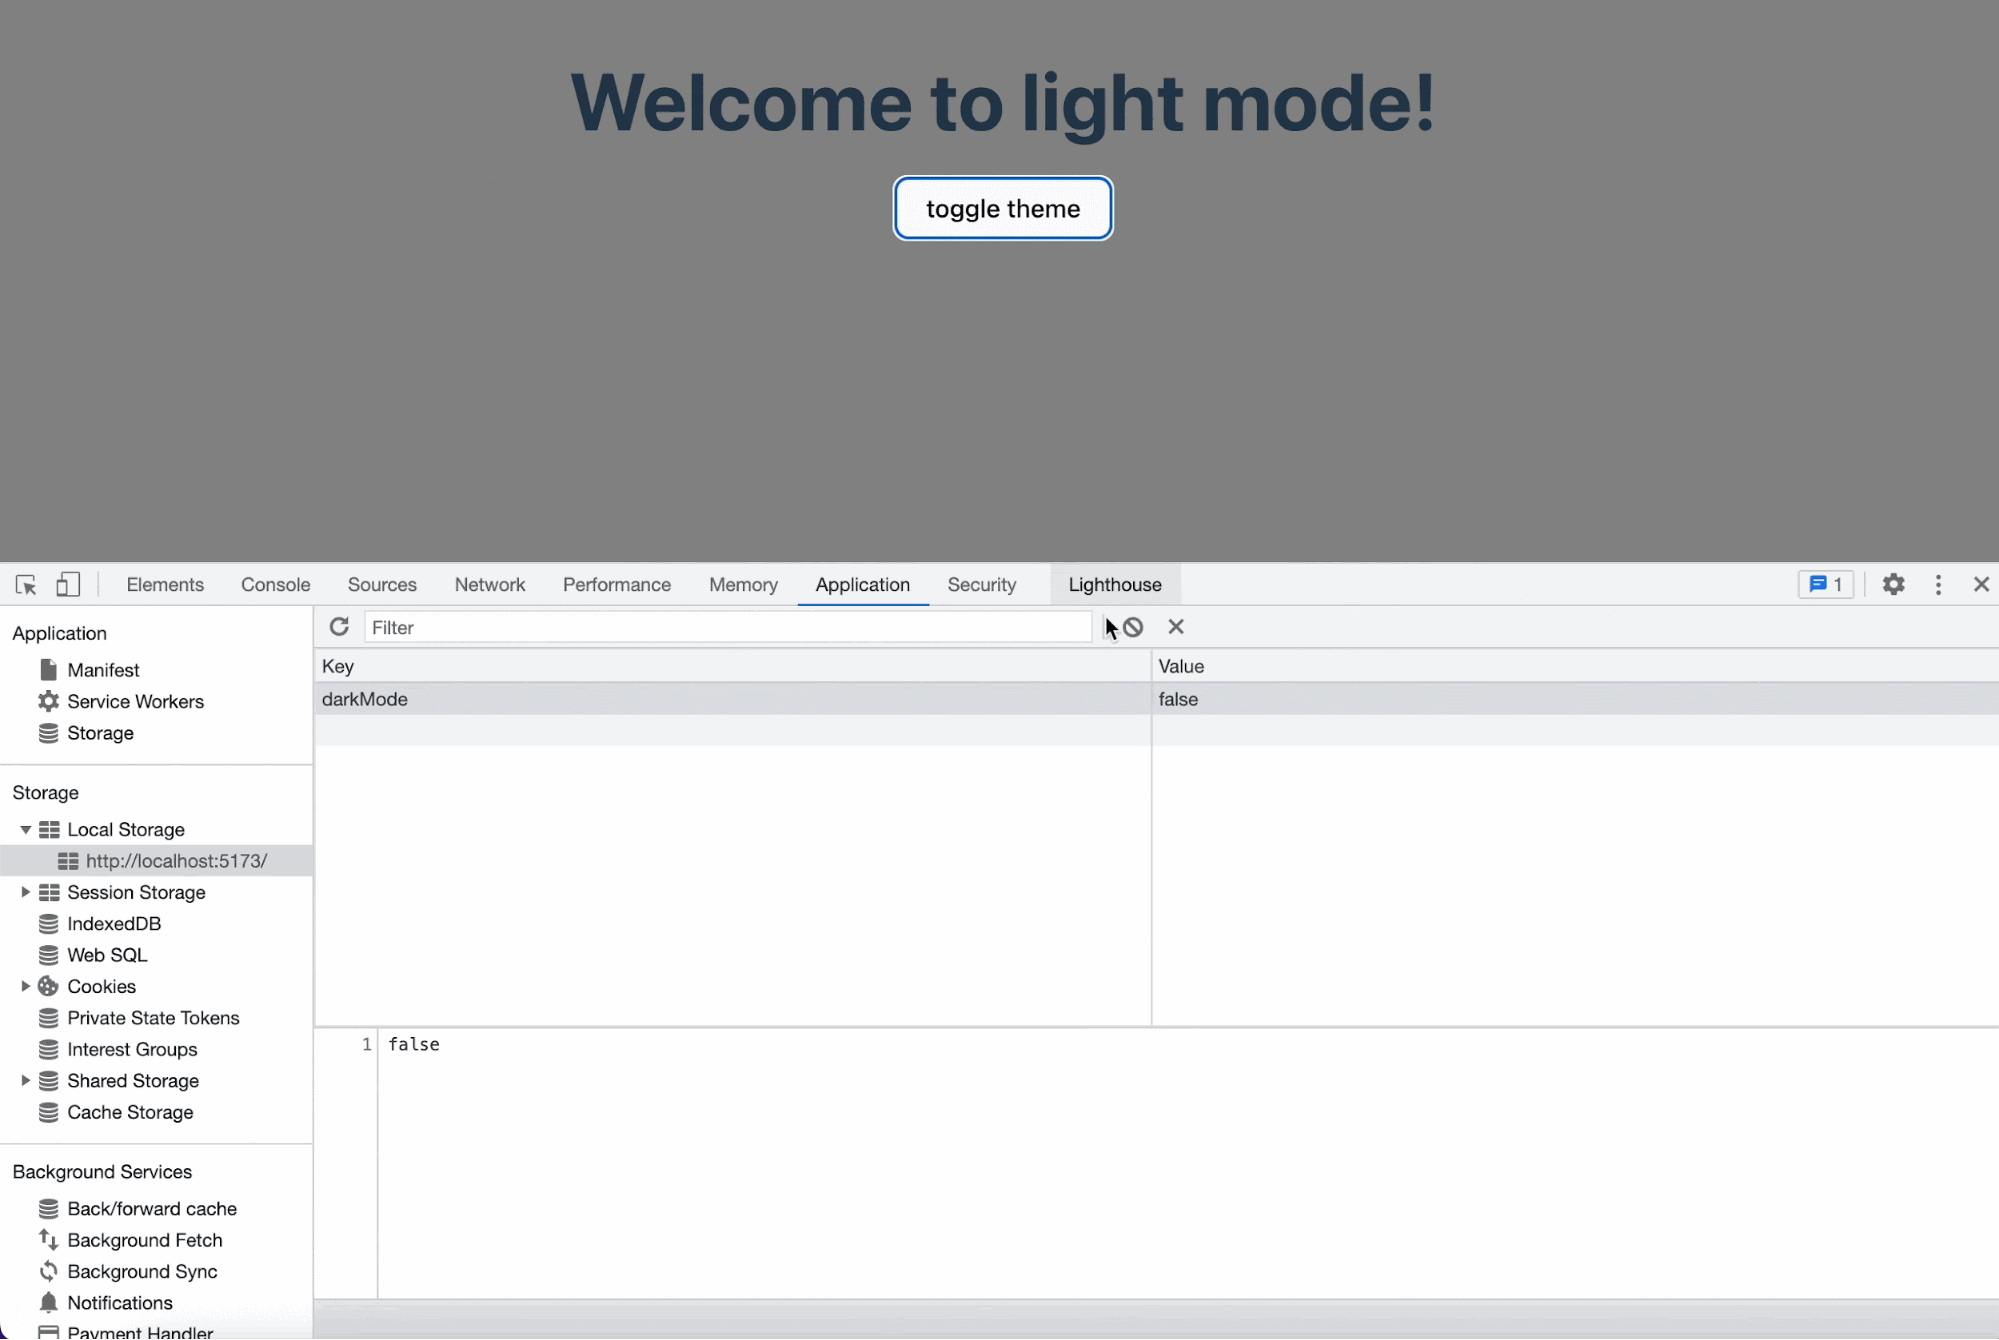
As you can see, the data is saved to Local Storage and gets modified when we click the button.
Besides this, there are several other utility functions that Jotai provides, like SSR functionality and more. Additionally, you can use this state management tool in various frameworks such as Next.js, Remix, and it also integrates with tRPC, Molecules, Optics, and more.
Lastly, Jotai offers multiple plugins to enhance your development experience and facilitate code debugging, including plugins like plugin-react-refresh, jotai-devtools, and more.
Decoding the Best Approach for Your React Project
The recommended approach for most projects is to use React Context when your app doesn't require frequent updates. However, if you need to manage a number of states in your app, it would be ideal to use state management tools like Redux and Jotai.
But which one is best for you? Well, there isn't a definitive answer, as both tools are great and offer a range of functionalities. The choice ultimately depends on your app's specific needs.
Let's provide you with a more specific approach: If your app is simple and you are already familiar with Redux, it would be wise to go with Redux, especially considering it even provides features like Redux DevTools.
On the other hand, if you want to leverage various Jotai features, such as utility functions and plugins, and prefer an easy learning curve with less boilerplate code, then Jotai would be a better choice.
Jotai works great when the codebase is modular and split into components. For this, you can use the Locofy.ai plugin to generate modular, and highly extensible React components directly from your Figma & Adobe XD design files.
You can use the auto layout feature on Figma to make your designs responsive on the Locofy.ai plugin and even if your designs don't utilize auto layouts, the plugin offers a Design Optimizer feature that uses AI to apply auto layouts to your design files. Once your designs are responsive, you can use the Auto Components feature to split your design elements into working React components, making them easy to extend.
If you want to learn more about how to convert your Figma or Adobe XD designs to React, React Native, HTML/CSS, Nextjs, and more, check out our docs. Or explore our solution pages for an in-depth look at how Locofy helps you build apps, websites, portfolio pages and responsive prototypes effortlessly using our low-code platform with seamless AI code generation.
Join the discord server for more updates, and try our sample projects on Figma to experience Lightning.
⬇ Download the code here and try it yourself.

