VS Code Extension
The Locofy VS Code extension seamlessly integrates the powerful capabilities of Locofy into the VS Code environment. Developers can effortlessly fetch projects, components, pages, and styles, streamlining the workflow by eliminating the need to switch platforms.
Installation
- Open VS Code on your machine. If you don’t have VS Code installed, download it here (opens in a new tab).
- In VS Code, click the Extensions button in the left panel or you can use the shortcuts:
- Mac:
CMD + Shift + X - Windows / Linux:
CTRL + Shift + X.
- Mac:
- Search for “Locofy” and click the install button.
Getting Started
After installation, utilize the prebuilt commands provided by the Locofy.ai extension to enhance your coding experience.
To access commands:
- Once the VS code has been installed use the following shortcuts:
- Mac:
CMD + Shift + P - Windows / Linux:
CTRL + Shift + P
- Mac:
- For quicker access, click on the Locofy icon in the VS Code status bar at the bottom, which provides a dropdown of all available commands.
Available Commands
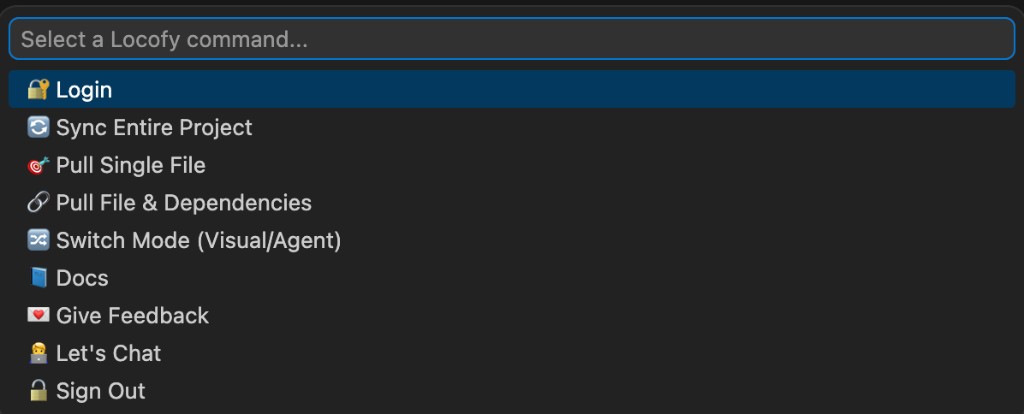
- Login: Login into your Locofy.ai account.
- Sync Entire Project: Synchronize your entire project—including code created or modified in Agent Mode (theming, validation, accessibility, and other AI-driven enhancements).
- Pull Single File: Retrieve specific components, pages, CSS, or config files.
- Pull File & Dependencies: Fetch specific files and their dependencies.
- Switch Mode (Visual/Agent): Switch between Visual Mode and Agent Mode when working on your project in the Locofy Builder. Use this to toggle between the structure-focused Visual Mode and the prompt-based Agent Mode for AI-driven improvements.
- Docs: Visit the official Locofy.ai documentation (opens in a new tab).
- Give Feedback: Share your insights via a short questionnaire (opens in a new tab).
- Join us on Discord: Join the Locofy.ai us on Discord (opens in a new tab).
- Sign Out: Log out of your Locofy account.
Switching Between Visual and Agent Mode
When working on projects in Locofy Builder, you can switch between Visual Mode and Agent Mode directly from VS Code. Use the Switch Mode (Visual/Agent) command from the Locofy command palette to toggle between:
- Visual Mode: Review and adjust the structure and components of your design—ideal for understanding the layout and mapping design elements to code.
- Agent Mode: Use prompts to add enhancements such as theming, validation, accessibility, interactive carousels, and more—without writing code manually.
Open the command palette (CMD + Shift + P on Mac, CTRL + Shift + P on Windows/Linux) or click the Locofy icon in the status bar, then select Switch Mode (Visual/Agent) to change modes.
Accessing to the Locofy.ai Account
Using the Login command, you can access your Locofy.ai account. This command will redirect you to a web interface for completing the authentication process. Once completed, you can access your Locofy.ai projects via the extension.
Similarly, you can use the Sign out command to sign out from your account.
Fetching Entire Project Code
Use the Sync Entire Project command to pull your synced design from Locofy right into VS Code. This includes all code from Locofy Builder—whether generated from design or enhanced in Agent Mode (theming, validation, accessibility, carousels, and other AI-driven improvements).
- Open the commands menu by clicking the Locofy.ai icon present on the VS Code statusbar at the bottom.
- Select the
Sync Entire Projectcommand.
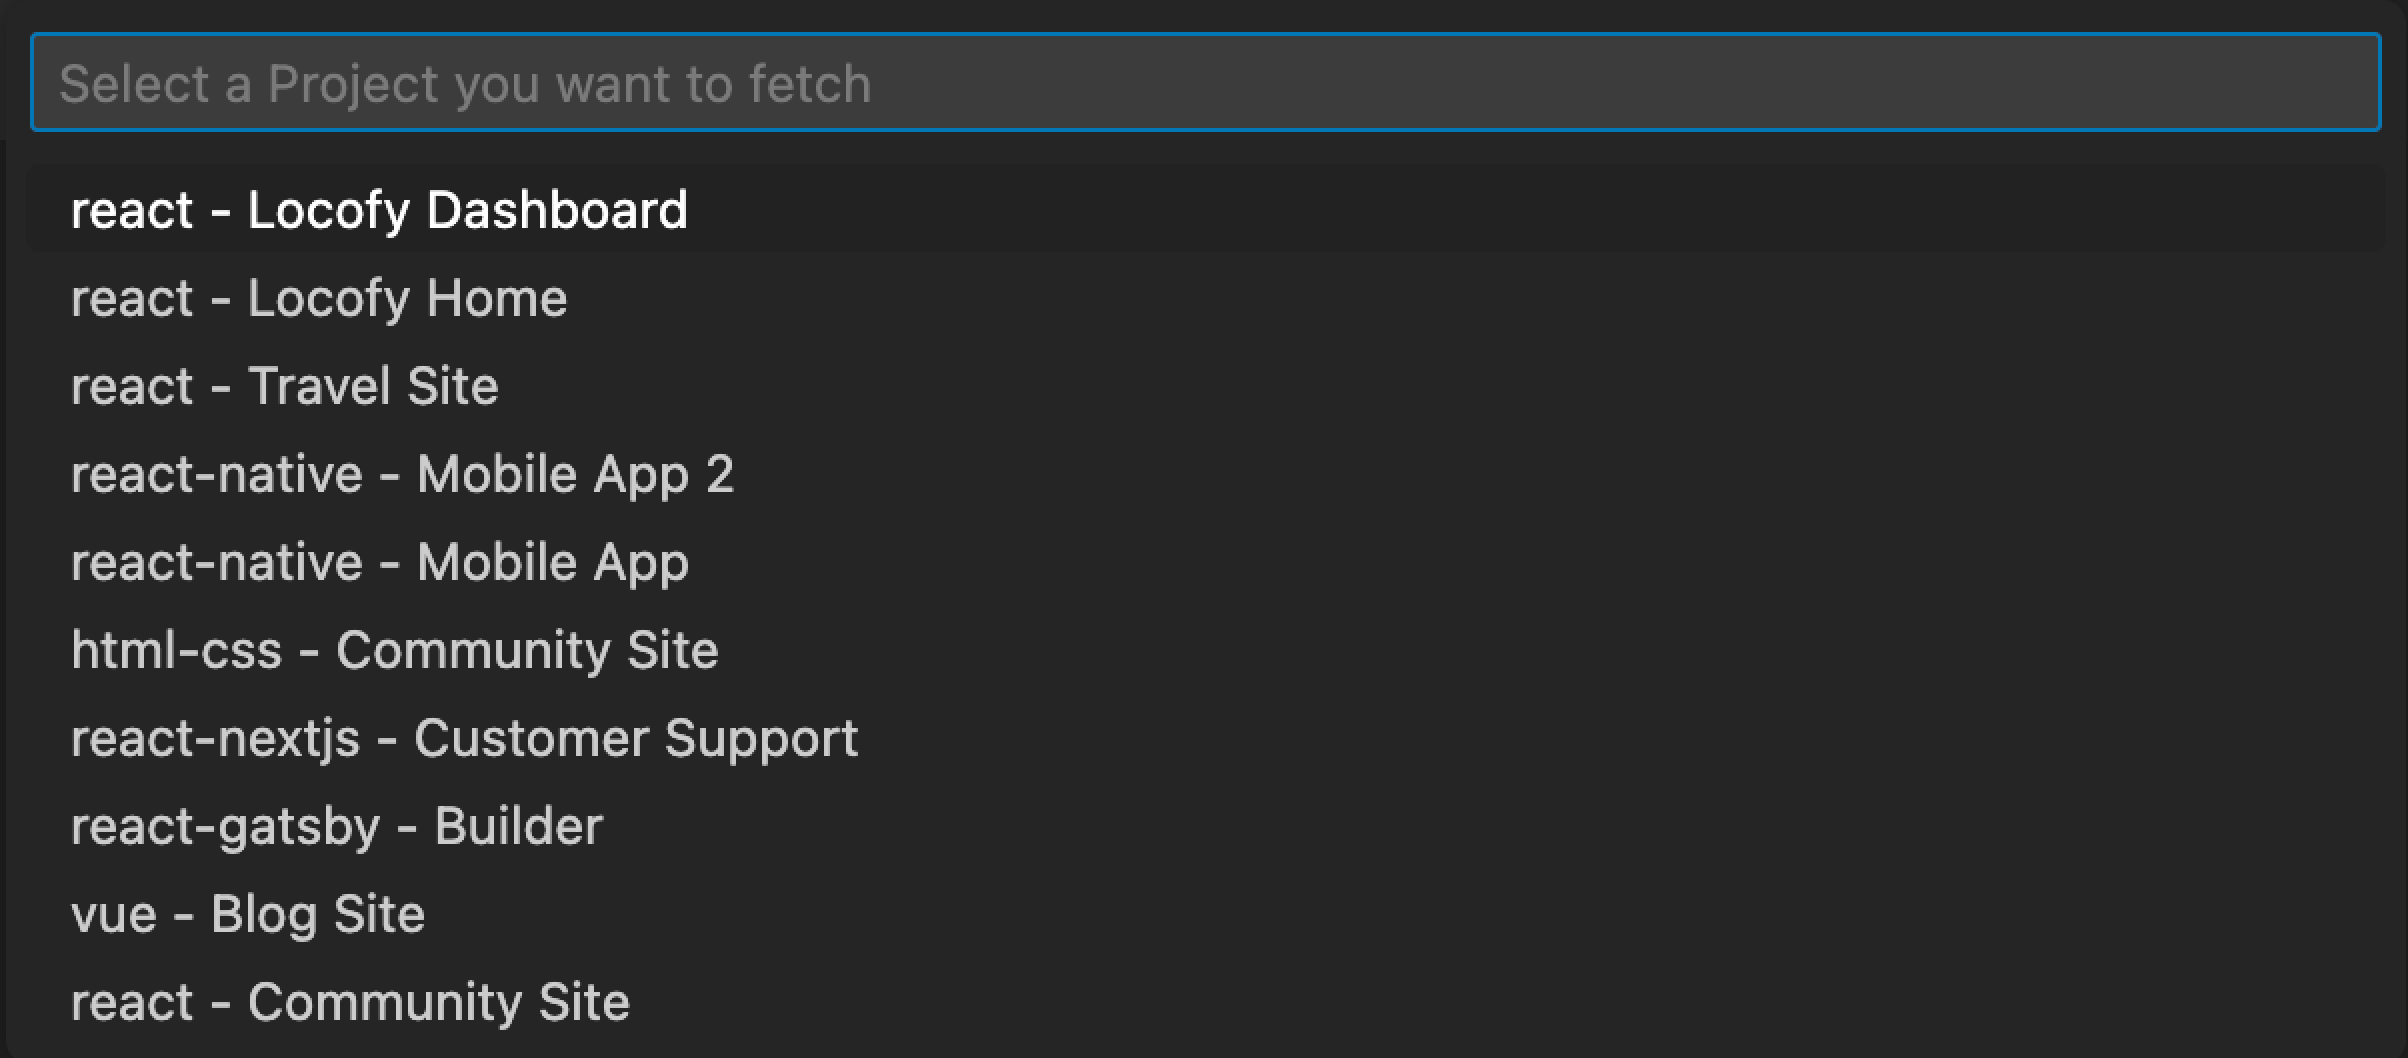
- You will be presented with a list of projects that are synced to the Builder. Select the project you need and the extension will pull the entire project into your VS Code.

Fetching Single File
You can use the Pull Single File command to fetch a specific file from your projects such as a component, page, CSS file, or configuration-related file.
- Open the file where you want to sync the code or create a new file.
- Next, open the commands menu by clicking the Locofy.ai icon present on the VS Code statusbar at the bottom.
- Select the
Pull Single Filecommand.
- You will be presented with a list of your projects you can a pull a file from. Select the project containing the file you need.
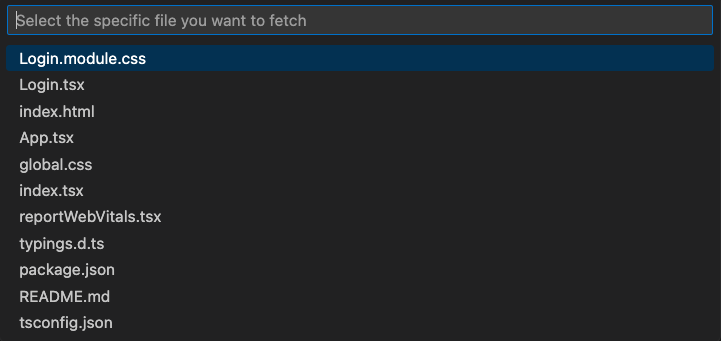
- You will see a list of files from the project you selected as shown below. Click on the file you need.
Now you should see pulled file's code present in your editor.
This command does not pull the dependencies required by that component such as any imports that the component may require to work correctly.
Fetching Single File with Dependencies
For pulling file with dependencies, use the Pull File & Dependencies command. This will not only pull the single file but also brings any assets, components, or other resources referenced within the main file.
- Open the file where you want to sync the code or create a new file.
- Next, open the commands menu by clicking the Locofy.ai icon present on the VS Code statusbar at the bottom.
- Select the
Pull File & Dependenciescommand.
- You will be presented with a list of your projects you can a pull a file from. Select the project containing the file you need.
- You will see a list of files from the project you selected as shown below. Click on the file you need.
You will notice that not only the file is pulled but its dependencies are pulled as well.
Conflict Detection & Resolution
The extension identifies any conflicts between the existing code and the new code fetched from Locofy.ai and presents a comparison, allowing you to easily resolve them.
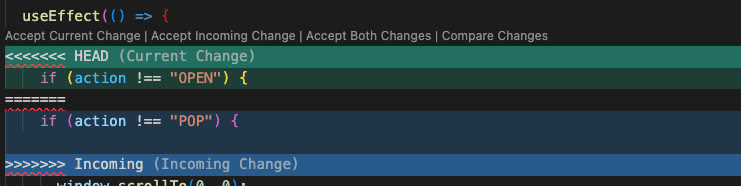
When you pull a file and its code is different from the existing code in your editor, you will see 4 options to resolve the conflicts:
- Accept Current Change: This options allows you to keep your local code.
- Accept Incoming Change: This option overwrites your local code and replaces with the newly generated code.
- Accept Both Changes: This options combines both incoming and current changes in the present file.
- Compare Changes: This option will open a side by side view for you to easily merge the code differences.